Brett Steen, Engineering Consultant01.07.19
Even though film-cast products such as polyimide tubing have been used within catheter-based medical device products for over 30 years, its manufacturing process is still not fully understood. This lack of understanding often leads to assumptions that are aligned with and based on the extrusion tubing process, rather than actual film-cast product’s source. This deficiency of film-cast process understanding, and extrusion process-based assumptions, often leads to incomplete specification oversite. In the context of this article, “specifications” will mean a potential source of film-cast tubing’s variability; therefore, the items discussed here can be used to understand capability for design purposes, used as a “roadmap” to define the source of a product defect, or used to write a customer’s tubing product specification.
Film-cast tubing products are often used as internal components or “inner-members” within the overall final catheter shaft. These internal components can be used as liners for multilumen extrusions to provide material properties not indicative to the extruded material. They are being increasingly used as outer shaft components to access relatively small blood vessels in neurology and coronary applications.
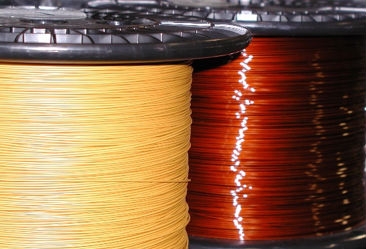
Figure 1: Film-cast tubing on continuous mandrel wire
Film-Cast Tubing Manufacturing Process
Film-cast is a process for making tubing in which a thin layer of liquid polymer coating is applied over a continuous length of solid metal mandrel (wire). This liquid layer of coating is then solidified using heat exposure. The coating and heating process is repeated, creating additional layers of polymer until the desired tubing wall thickness is achieved. Once the correct wall thickness is achieved, the continuous coated mandrel (Figure 1) is cut into discrete pieces/lengths and the solid metal mandrel is removed, resulting in a micro-diameter tubing product (Figure 2).
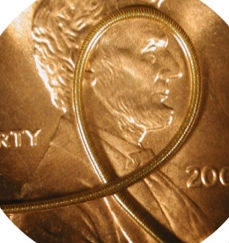
Figure 2: Film-cast coil reinforced micro tubing with mandrel removed
The precision of this film-cast process comes from the multi-pass coating technology that applies extremely thin layers of polymer, in addition to the presence of a continuous mandrel the coating thickness is built over. Film-cast liquid coatings are comprised of only about 20 percent solid polymer, so an applied liquid coating thickness of 0.001 inch, after heating, can result in a solid layer that has a thickness of only 0.0002 inch. As for the wire mandrel, the outside diameter (OD) of the mandrel defines the inside diameter (ID) of the finished tubing product. The finished tubing product’s ID is molded around this continuous length of wire mandrel. As long as the wire mandrel’s OD and surface quality remains consistent, so will the tubing’s ID dimension and inner liner’s surface quality.
Cross-Sectional Dimension ID, Wall Concentricity, and OD
The benefit of film-cast’s thin wall, tight tolerance, and micro-diameter can also become a problem when it comes time to measure ID and OD. Minor variations caused by the measurement (test) method of 0.0001 to 0.0003 inch can be enough to pass or fail the product. For this reason, the measurement method needs to be scrutinized for being the potential cause of measurement variability.
Inside Diameter
An inside diameter tolerance for film-cast tubing should range between ±0.0003 to 0.0005 inch. In general, the larger the ID, the larger the necessary ID tolerance. When a customer places an order for a tubing shaft with a certain ID, the supplier will find a larger diameter wire already in stock and draw down the wire’s OD to match or closely match the ID’s nominal tubing spec. Most important, the mandrel wire is drawn down and sized to target the tubing’s nominal ID dimension. If you are finalizing the specifications for a tubing product that is going into production, you may want to consider purchasing the exact size drawing die or dies that are only to be used for your company’s tubing product. This way you can be more assured the ID specification is/remains consistent throughout numerous production runs.
To measure the ID of a length of finished micro-tubing product, the best method involves using pin gauges. Since film-cast tubing is built over a solid mandrel, the tubing tends to have a very consistent ID. In other words, insertion of a two-inch-long pin gauge into one end of the tubing will represent the ID for the entire length.
There is an “old-school” ID measuring technique that uses a tapered mandrel and hand micrometer. The mandrel, in this case, is a straightened six-inch length of stainless steel that has been centerless ground to create variable diameter or taper. The tapered mandrel is inserted into the ID of the tubing until it stops. The tapered mandrel is then pulled back slightly and measured with a hand micrometer at the point where the ID of the tubing stopped the mandrel from being inserted any further. This method of measuring ID can be very inconsistent. If a supplier wants to use this method, they should be able to back-up its consistency with a gage R&R study.
Wall Concentricity
Wall concentricity (the equality of all wall thickness around the tubing’s circumference) is a specification that is often assumed and rarely stated within the tubing’s list of specifications. Characterization of concentricity is based upon actual wall thickness measurements that are evenly taken from around the circumference of the tubing.
In any concentricity calculation, the wall thickness must always be physically measured. Often wall thickness is not measured, but instead calculated using the difference between OD and ID. This calculated wall thickness “formula” is (OD - ID)/2. In viewing Figure 3, it is easy to understand why this methodology can be used to hide wall thickness variability, rather than inspect for it.
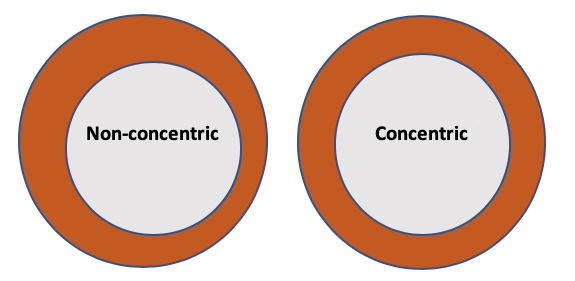
Figure 3: Concentricity vs. non-concentric tubing
One of the best methods to evaluate wall concentricity is to use percent wall concentricity (PWC). PWC is a calculation that enables the objective definition of a certain level of wall thickness equality around the tubing’s circumference. First take four to six equally spaced wall-thickness measurements around all 360 degrees of the tubing’s cross-sectional circumference (i.e., four to six actual measurements, not calculated estimates). From these measurements, define the smallest and largest of these values, then apply these two values to the following formula.
PWC = (Minimum Wall Thickness/Maximum Wall Thickness) X 100 percent
The minimum PWC according to industry standards is 70 percent, but depending upon the application, 80 to 90 percent may be required.
Outside Diameter
Outside diameter is still an essential dimensional specification, especially with regard to how the tubing will assemble with other catheter components. Regardless, an OD specification must always be accompanied by ID and PWC specifications. These three specifications (ID, PWC, and OD) should always be considered as a single interdependent group.
Following is an example of a specification for a pure polyimide tube that exemplifies the use of ID, PWC, and OD.
The OD tolerance ranges between ±0.0003 to 0.0007 inch. Higher OD tolerance designs, which are tolerances greater than or equal to ±0.0005 inch, are for designs that include a braid or coil reinforcement.
When/Where in Process to Measure Dimensions
Inside diameter and percent wall concentricity must be measured off-line, so these measurements should be taken as part of the tubing process set-up procedure and at the end of some predetermined continuous length, such as 1,000 to 5,000 feet. In this case, the “tubing process” is where the continuous wire mandrel is coated with one or more polymers forming the tubing’s wall thickness. Operators can cut and remove the mandrel from short lengths of coated mandrel, and are, therefore, able to check ID and PWC. The thought here is if the process starts with good ID/concentricity and ends with good ID/concentricity, everything in between should be good as well.
Outside diameter can and should be measured in-line with at least a two-axis laser micrometer. This in-line measuring of coated wire diameter (tubing’s OD) can provide an early warning to problems with the mandrel diameter as well as the wall thickness variation. Note, the OD can sometimes be altered by the post-tubing process (process steps after coating and mandrel removal), so in-line laser micrometer OD measurements are never to be used as a substitution for final inspection measurements. The best final inspection OD measurement tool is also a laser micrometer, but in this case, a bench-top unit with a single laser axis and a rotating chuck. A short sample piece of tubing is placed in the chuck and is exposed to the laser field. The rotating chuck then rotates the sample within the laser field, resulting in multiple measurements around the circumference of the outer diameter. For example, if the chuck is programed to rotate in 60 degree increments, it will take six different measurements around the tubing’s outer perimeter.
Hand Micrometers
The use of a hand micrometer to measure the OD of polymer-based medical device components or products can be unreliable, especially when trying to measure film-cast tubing components with tolerances of only ±0.0003 to 0.0005 inch. The problem with hand micrometers is they are susceptible to measurement inaccuracies due to variation in the operators’ applied pressure. Hand micrometers require the operator to move the post and make direct contact with the material being measured. Different people will apply more or less pressure before stopping the post movement and taking a measurement. Also, depending upon the polymer being measured, the measurement will vary more for soft and elastic materials like PTFE or Pebax, and a little less for harder polymers like thermoset polyimide and polyphenylsulfone. Regardless of the polymer being measured, hand micrometer measurements are never consistent and worst of all, measurements can be manipulated.
Layer Thickness/Wall Construction
Another strength of the film-cast process is the ability to apply very thin layers of very different polymers and reinforcements at various cross-sectional locations throughout the entire wall of the tubing. Film-cast manufacturing companies usually specify these different layers as referenced thickness measurements without a tolerance. This is because the different layers are applied in manufacturing according to the measured OD. In other words, if the bare metal mandrel has a diameter of 0.05 inch and the operator needs to create a tubing with a 0.001 inch wall thickness of polyimide, they will apply multiple coating layers of polyimide until the OD is measured at 0.052 inch. If the spec then calls for an additional 0.0004 inch layer of Pebax 63D, the operator will apply multiple layers of Pebax coating until the OD measures 0.0528 inch.
Measuring the discrete layers of a film-cast tubing is more difficult than it sounds, since the layers are extremely thin. Even cutting a cross-section of a tube and measuring it under a microscope presents as challenging. If the cut is not near perfectly perpendicular to the tubing’s axis, the layer dimensions will be altered. As a result, softer polymers such as most thermoplastics (Pebax, nylon, etc.) will actually smear when physically cut and therefore distort the thickness of the layer you are measuring. Measuring OD to define wall thickness layers and defining wall thickness layers as “reference only” specs works, as long as it is done in conjunction with ID, OD, and PWC.
Following is an example of a final specification for the polyimide/Pebax tubing.
Cure
In the film-cast process, the degree at which the liquid coating is solidified, or phase changed from liquid to solid, is called the cure. This degree of cure is mainly determined by a combination of time exposed to heat energy and the level of this heat energy applied—essentially time and temperature. The cure of the film-cast coating used to build a tubing design can greatly affect its performance, especially regarding polyimide. Polyimide is one of the few film-cast coatings polymerized after it is applied to the mandrel. The liquid polyimide coating is actually not polyimide; rather, while the coating is in its liquid form, it is actually polyamic acid. Only after the coating is exposed to heat does it polymerize into polyimide. Due to this fact, the amount of cure has a significant effect on the polyimide’s mechanical properties.
As for thermoplastics like Pebax and nylon, these polymers have already been polymerized while in the liquid coating form. Solvents are used to move between the polymer chains and disrupt the attractive Van Der Waals forces that hold the thermoplastic polymer chains together as a solid. Most thermoplastics solidification is simply a matter of removing the solvent using heat vaporization, and therefore, reestablishing the electronegative Van Der Waals forces.
The defining and testing for the level of cure can be a very complex, especially when considering a film-cast tubing comprised of a hybrid of different polymer types. Both too little and too much cure can have a negative effect on the final tubing shaft product. Plus, what constitutes too much or too little cure is dependent on the polymer coating being cured. From a film-cast tubing user’s perspective, usually the best way to ensure and define a good cure is by identifying mechanical properties according to tensile testing.
Tensile Testing
Tensile testing is one of the best ways to evaluate and analyze a material’s mechanical properties. Modern tensile testing equipment provides a stress-strain diagram or curve (Figure 4) that plots the stress or tensile force produced by elongating a sample length of tubing. Most tensile testing involves elongating a tubing sample until it breaks, then defining the break force and percent elongation at the point of failure. Common tensile test specifications are minimum break force (lbs.) and minimum elongation at break (percent).
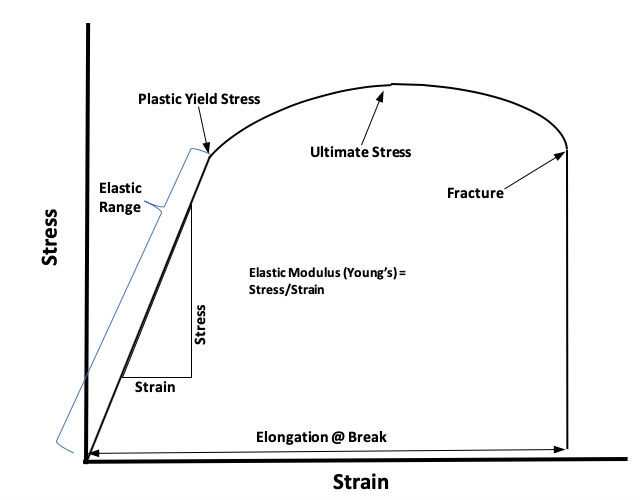
Figure 4: Basic stress-strain diagram or curve for a polymer
This is a valid means of evaluating tubing material properties, but this break-based test is not in-line with how catheter device shafts are used in real applications. In actual device applications, the final catheter shafts are rarely elongated beyond 3 percent, if even this much. Many catheter devices require that virtually no elongation results from applied tensile forces of 1 to 3 lbs. This is especially true for self-expanding stent technologies, where any tensile elongation will result in reduction of the inner lumen diameter, which will affect the ease and accuracy of stent deployment.
Relative to catheter usage, the most important information on a stress-strain diagram is gained within the elastic range and up to the plastic yield stress. Within this part of the curve, Young’s elastic modulus (measure of stiffness), point of plastic yield, and amount of elastic elongation caused per each unit of tensile force can all be defined.
When defining tensile testing specifications, it is very important to define the testing inputs or the set-up conditions. These conditions are inputs made to the tensile test equipment. The outcomes or values of tensile tests can be significantly changed solely by using different set-up conditions. Tensile specifications must always be accompanied by set-up conditions. The following list offers tensile testing set-up conditions.
Ultimately, the best specification to define a tubing’s mechanical property that will provide a good indication of the film-cast cure is Young’s elastic modulus. Young’s modulus is the perfect blend of tensile force and elongation. It is this ratio or slope of the linear line that defines the elastic range that provides the best means to define the cure of any film-cast tubing product.
Conclusion
Film-cast tubing excels at and is known for producing single lumen shafts with thin walls, tight tolerances, and micro diameters. To ensure these benefits are controlled and verified, specifications must consider the actual process they are created within. Many times, film-cast specifications mistakenly reflect and assume extrusion-based tubing process technology, rather than the distinctive and significantly different film-cast process. The specifications discussed in this article are those often not considered and/or wrongly tested. By taking into account the uniqueness of the film-cast process, we are better empowered to define, test, and validate important specifications, and therefore, minimizing the risks associated with these micro-diameter tubing catheter components.
Brett Steen is an independent engineering consultant specializing in the design and manufacturing process of micro-diameter catheter-based medical devices. Steen has 20 years of experience in the industry. He currently is involved in catheter development projects, as well as projects for the new introduction or improvement of film-cast manufacturing technology. He can be contacted at brettsteen32@gmail.com.
Film-cast tubing products are often used as internal components or “inner-members” within the overall final catheter shaft. These internal components can be used as liners for multilumen extrusions to provide material properties not indicative to the extruded material. They are being increasingly used as outer shaft components to access relatively small blood vessels in neurology and coronary applications.
Figure 1: Film-cast tubing on continuous mandrel wire
Film-cast is a process for making tubing in which a thin layer of liquid polymer coating is applied over a continuous length of solid metal mandrel (wire). This liquid layer of coating is then solidified using heat exposure. The coating and heating process is repeated, creating additional layers of polymer until the desired tubing wall thickness is achieved. Once the correct wall thickness is achieved, the continuous coated mandrel (Figure 1) is cut into discrete pieces/lengths and the solid metal mandrel is removed, resulting in a micro-diameter tubing product (Figure 2).
Figure 2: Film-cast coil reinforced micro tubing with mandrel removed
Cross-Sectional Dimension ID, Wall Concentricity, and OD
The benefit of film-cast’s thin wall, tight tolerance, and micro-diameter can also become a problem when it comes time to measure ID and OD. Minor variations caused by the measurement (test) method of 0.0001 to 0.0003 inch can be enough to pass or fail the product. For this reason, the measurement method needs to be scrutinized for being the potential cause of measurement variability.
Inside Diameter
An inside diameter tolerance for film-cast tubing should range between ±0.0003 to 0.0005 inch. In general, the larger the ID, the larger the necessary ID tolerance. When a customer places an order for a tubing shaft with a certain ID, the supplier will find a larger diameter wire already in stock and draw down the wire’s OD to match or closely match the ID’s nominal tubing spec. Most important, the mandrel wire is drawn down and sized to target the tubing’s nominal ID dimension. If you are finalizing the specifications for a tubing product that is going into production, you may want to consider purchasing the exact size drawing die or dies that are only to be used for your company’s tubing product. This way you can be more assured the ID specification is/remains consistent throughout numerous production runs.
To measure the ID of a length of finished micro-tubing product, the best method involves using pin gauges. Since film-cast tubing is built over a solid mandrel, the tubing tends to have a very consistent ID. In other words, insertion of a two-inch-long pin gauge into one end of the tubing will represent the ID for the entire length.
There is an “old-school” ID measuring technique that uses a tapered mandrel and hand micrometer. The mandrel, in this case, is a straightened six-inch length of stainless steel that has been centerless ground to create variable diameter or taper. The tapered mandrel is inserted into the ID of the tubing until it stops. The tapered mandrel is then pulled back slightly and measured with a hand micrometer at the point where the ID of the tubing stopped the mandrel from being inserted any further. This method of measuring ID can be very inconsistent. If a supplier wants to use this method, they should be able to back-up its consistency with a gage R&R study.
Wall Concentricity
Wall concentricity (the equality of all wall thickness around the tubing’s circumference) is a specification that is often assumed and rarely stated within the tubing’s list of specifications. Characterization of concentricity is based upon actual wall thickness measurements that are evenly taken from around the circumference of the tubing.
In any concentricity calculation, the wall thickness must always be physically measured. Often wall thickness is not measured, but instead calculated using the difference between OD and ID. This calculated wall thickness “formula” is (OD - ID)/2. In viewing Figure 3, it is easy to understand why this methodology can be used to hide wall thickness variability, rather than inspect for it.
Figure 3: Concentricity vs. non-concentric tubing
One of the best methods to evaluate wall concentricity is to use percent wall concentricity (PWC). PWC is a calculation that enables the objective definition of a certain level of wall thickness equality around the tubing’s circumference. First take four to six equally spaced wall-thickness measurements around all 360 degrees of the tubing’s cross-sectional circumference (i.e., four to six actual measurements, not calculated estimates). From these measurements, define the smallest and largest of these values, then apply these two values to the following formula.
PWC = (Minimum Wall Thickness/Maximum Wall Thickness) X 100 percent
The minimum PWC according to industry standards is 70 percent, but depending upon the application, 80 to 90 percent may be required.
Outside Diameter
Outside diameter is still an essential dimensional specification, especially with regard to how the tubing will assemble with other catheter components. Regardless, an OD specification must always be accompanied by ID and PWC specifications. These three specifications (ID, PWC, and OD) should always be considered as a single interdependent group.
Following is an example of a specification for a pure polyimide tube that exemplifies the use of ID, PWC, and OD.
- Polyimide tubing
- ID = 0.0428” ±0.0005”
- OD = 0.0468” ±0.0005”
- Wall thickness = 0.002” reference
- Percent Wall Concentricity = 75% MIN
The OD tolerance ranges between ±0.0003 to 0.0007 inch. Higher OD tolerance designs, which are tolerances greater than or equal to ±0.0005 inch, are for designs that include a braid or coil reinforcement.
When/Where in Process to Measure Dimensions
Inside diameter and percent wall concentricity must be measured off-line, so these measurements should be taken as part of the tubing process set-up procedure and at the end of some predetermined continuous length, such as 1,000 to 5,000 feet. In this case, the “tubing process” is where the continuous wire mandrel is coated with one or more polymers forming the tubing’s wall thickness. Operators can cut and remove the mandrel from short lengths of coated mandrel, and are, therefore, able to check ID and PWC. The thought here is if the process starts with good ID/concentricity and ends with good ID/concentricity, everything in between should be good as well.
Outside diameter can and should be measured in-line with at least a two-axis laser micrometer. This in-line measuring of coated wire diameter (tubing’s OD) can provide an early warning to problems with the mandrel diameter as well as the wall thickness variation. Note, the OD can sometimes be altered by the post-tubing process (process steps after coating and mandrel removal), so in-line laser micrometer OD measurements are never to be used as a substitution for final inspection measurements. The best final inspection OD measurement tool is also a laser micrometer, but in this case, a bench-top unit with a single laser axis and a rotating chuck. A short sample piece of tubing is placed in the chuck and is exposed to the laser field. The rotating chuck then rotates the sample within the laser field, resulting in multiple measurements around the circumference of the outer diameter. For example, if the chuck is programed to rotate in 60 degree increments, it will take six different measurements around the tubing’s outer perimeter.
Hand Micrometers
The use of a hand micrometer to measure the OD of polymer-based medical device components or products can be unreliable, especially when trying to measure film-cast tubing components with tolerances of only ±0.0003 to 0.0005 inch. The problem with hand micrometers is they are susceptible to measurement inaccuracies due to variation in the operators’ applied pressure. Hand micrometers require the operator to move the post and make direct contact with the material being measured. Different people will apply more or less pressure before stopping the post movement and taking a measurement. Also, depending upon the polymer being measured, the measurement will vary more for soft and elastic materials like PTFE or Pebax, and a little less for harder polymers like thermoset polyimide and polyphenylsulfone. Regardless of the polymer being measured, hand micrometer measurements are never consistent and worst of all, measurements can be manipulated.
Layer Thickness/Wall Construction
Another strength of the film-cast process is the ability to apply very thin layers of very different polymers and reinforcements at various cross-sectional locations throughout the entire wall of the tubing. Film-cast manufacturing companies usually specify these different layers as referenced thickness measurements without a tolerance. This is because the different layers are applied in manufacturing according to the measured OD. In other words, if the bare metal mandrel has a diameter of 0.05 inch and the operator needs to create a tubing with a 0.001 inch wall thickness of polyimide, they will apply multiple coating layers of polyimide until the OD is measured at 0.052 inch. If the spec then calls for an additional 0.0004 inch layer of Pebax 63D, the operator will apply multiple layers of Pebax coating until the OD measures 0.0528 inch.
Measuring the discrete layers of a film-cast tubing is more difficult than it sounds, since the layers are extremely thin. Even cutting a cross-section of a tube and measuring it under a microscope presents as challenging. If the cut is not near perfectly perpendicular to the tubing’s axis, the layer dimensions will be altered. As a result, softer polymers such as most thermoplastics (Pebax, nylon, etc.) will actually smear when physically cut and therefore distort the thickness of the layer you are measuring. Measuring OD to define wall thickness layers and defining wall thickness layers as “reference only” specs works, as long as it is done in conjunction with ID, OD, and PWC.
Following is an example of a final specification for the polyimide/Pebax tubing.
- Polyimide/Pebax 63D Tubing
- ID = 0.0428” ±0.0005”
- OD = 0.0474 ±0.0005”
-
Wall thickness = 0.0023” reference
- Layer 1 (inner liner): Polyimide 0.002” Ref.
- Layer 2: Pebax 63D 0.0003” Ref.
- Percent Wall Concentricity = 75% MIN
Cure
In the film-cast process, the degree at which the liquid coating is solidified, or phase changed from liquid to solid, is called the cure. This degree of cure is mainly determined by a combination of time exposed to heat energy and the level of this heat energy applied—essentially time and temperature. The cure of the film-cast coating used to build a tubing design can greatly affect its performance, especially regarding polyimide. Polyimide is one of the few film-cast coatings polymerized after it is applied to the mandrel. The liquid polyimide coating is actually not polyimide; rather, while the coating is in its liquid form, it is actually polyamic acid. Only after the coating is exposed to heat does it polymerize into polyimide. Due to this fact, the amount of cure has a significant effect on the polyimide’s mechanical properties.
As for thermoplastics like Pebax and nylon, these polymers have already been polymerized while in the liquid coating form. Solvents are used to move between the polymer chains and disrupt the attractive Van Der Waals forces that hold the thermoplastic polymer chains together as a solid. Most thermoplastics solidification is simply a matter of removing the solvent using heat vaporization, and therefore, reestablishing the electronegative Van Der Waals forces.
The defining and testing for the level of cure can be a very complex, especially when considering a film-cast tubing comprised of a hybrid of different polymer types. Both too little and too much cure can have a negative effect on the final tubing shaft product. Plus, what constitutes too much or too little cure is dependent on the polymer coating being cured. From a film-cast tubing user’s perspective, usually the best way to ensure and define a good cure is by identifying mechanical properties according to tensile testing.
Tensile Testing
Tensile testing is one of the best ways to evaluate and analyze a material’s mechanical properties. Modern tensile testing equipment provides a stress-strain diagram or curve (Figure 4) that plots the stress or tensile force produced by elongating a sample length of tubing. Most tensile testing involves elongating a tubing sample until it breaks, then defining the break force and percent elongation at the point of failure. Common tensile test specifications are minimum break force (lbs.) and minimum elongation at break (percent).
Figure 4: Basic stress-strain diagram or curve for a polymer
This is a valid means of evaluating tubing material properties, but this break-based test is not in-line with how catheter device shafts are used in real applications. In actual device applications, the final catheter shafts are rarely elongated beyond 3 percent, if even this much. Many catheter devices require that virtually no elongation results from applied tensile forces of 1 to 3 lbs. This is especially true for self-expanding stent technologies, where any tensile elongation will result in reduction of the inner lumen diameter, which will affect the ease and accuracy of stent deployment.
Relative to catheter usage, the most important information on a stress-strain diagram is gained within the elastic range and up to the plastic yield stress. Within this part of the curve, Young’s elastic modulus (measure of stiffness), point of plastic yield, and amount of elastic elongation caused per each unit of tensile force can all be defined.
When defining tensile testing specifications, it is very important to define the testing inputs or the set-up conditions. These conditions are inputs made to the tensile test equipment. The outcomes or values of tensile tests can be significantly changed solely by using different set-up conditions. Tensile specifications must always be accompanied by set-up conditions. The following list offers tensile testing set-up conditions.
- Test length: The length of material or tubing being tested. This is the distance between the two clamps.
- Test speed: The rate at which the sample is elongated or the rate at which the tester clamps move away from one another. The stress-strain curve test results can often be drastically changed by running the test at an elevated speed.
- Load cell: All load transducers have the ability to measure force up to a certain maximum specified level. Load cells are usually defined by this maximum tensile force that can be applied. A 20-lbs. load cell can be exposed to a tensile force from 0 to 20 lbs. Using the correct load cell is about optimizing the precision of the data. Using a 100 lbs. load cell for a tubing product that consistently fails at less than 2 lbs. is not going to give quality precision data.
- Distance between the break failure and clamp: The clamps of the testing equipment can create or speed up a tensile failure due to the compression or pinch applied to the tubing. Depending upon tubing diameter, I prefer anywhere between 1/8 to 1/4 inch. A break forming close to the clamp should be thrown out and retested.
Ultimately, the best specification to define a tubing’s mechanical property that will provide a good indication of the film-cast cure is Young’s elastic modulus. Young’s modulus is the perfect blend of tensile force and elongation. It is this ratio or slope of the linear line that defines the elastic range that provides the best means to define the cure of any film-cast tubing product.
Conclusion
Film-cast tubing excels at and is known for producing single lumen shafts with thin walls, tight tolerances, and micro diameters. To ensure these benefits are controlled and verified, specifications must consider the actual process they are created within. Many times, film-cast specifications mistakenly reflect and assume extrusion-based tubing process technology, rather than the distinctive and significantly different film-cast process. The specifications discussed in this article are those often not considered and/or wrongly tested. By taking into account the uniqueness of the film-cast process, we are better empowered to define, test, and validate important specifications, and therefore, minimizing the risks associated with these micro-diameter tubing catheter components.
Brett Steen is an independent engineering consultant specializing in the design and manufacturing process of micro-diameter catheter-based medical devices. Steen has 20 years of experience in the industry. He currently is involved in catheter development projects, as well as projects for the new introduction or improvement of film-cast manufacturing technology. He can be contacted at brettsteen32@gmail.com.
